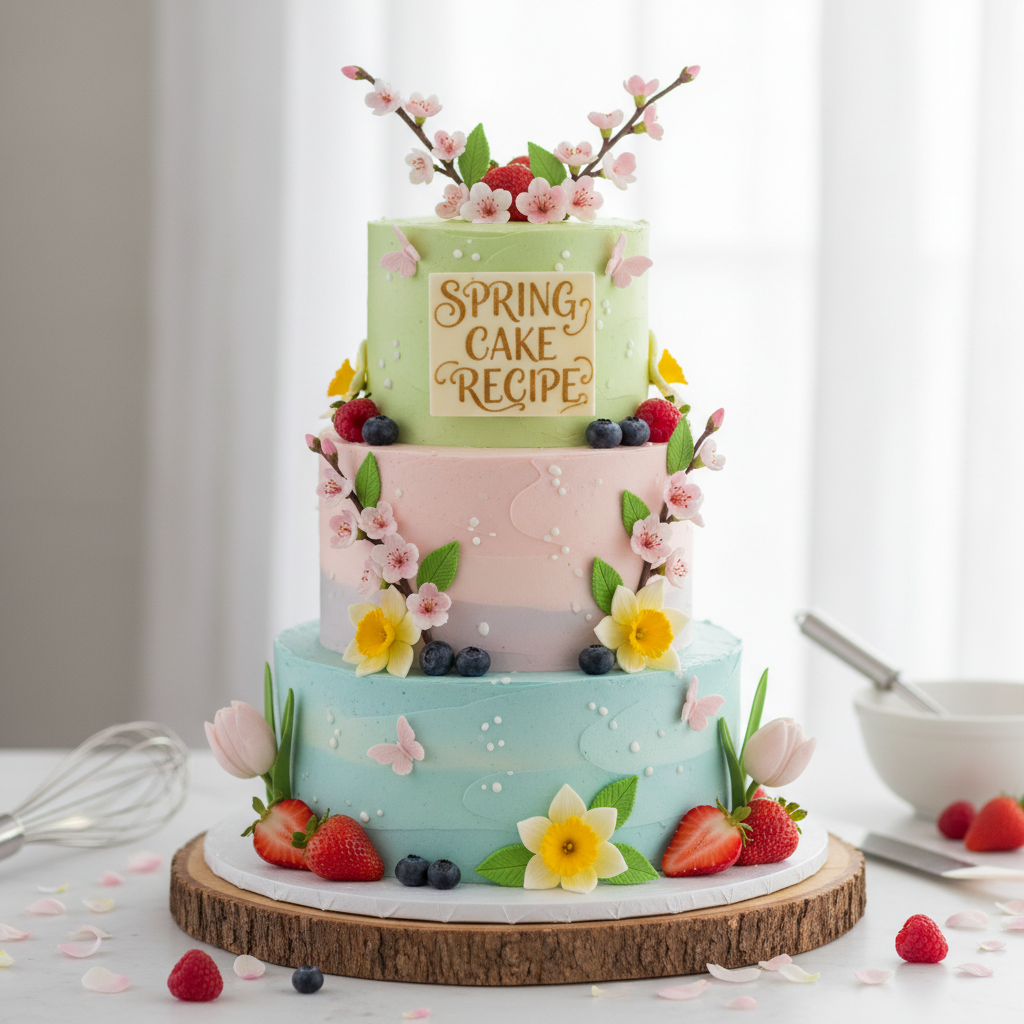
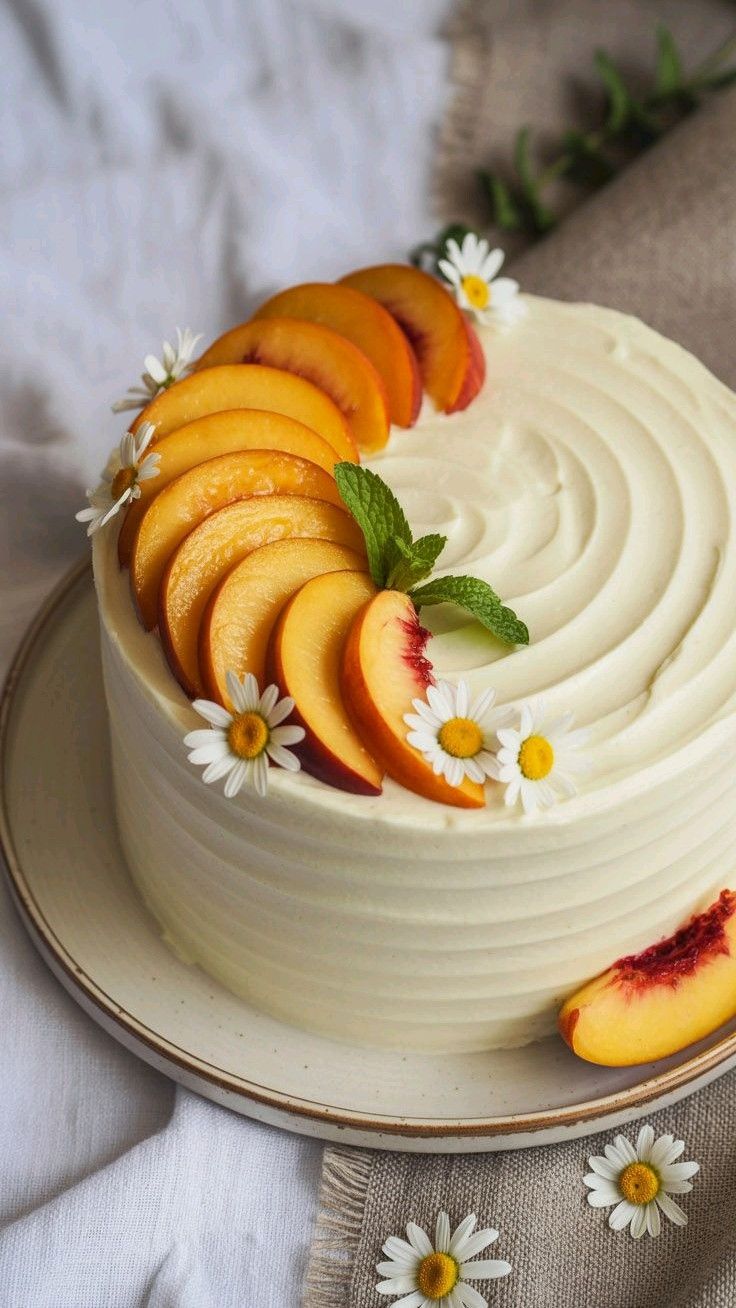
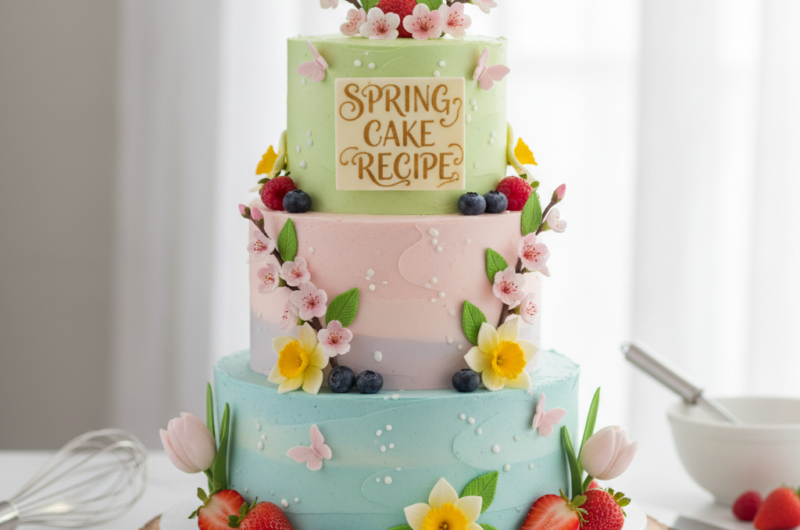
Author: admin

  • Spring Cakes

    Spring Cakes

    Introduction

    Are you searching for a light, soft dessert that feels like sunshine on a plate? Spring cakes are the kind of sweet treat that bring a fresh, airy feel to your table without being too heavy or rich. This is the kind of recipe I often turn to when I want something simple but still special enough for guests or family tea time. The texture stays fluffy, the flavor feels bright, and it works perfectly for small gatherings or quiet weekends at home. Spring Cakes are easy to prepare, and they always give that comforting homemade feeling.

    Why You Will Love This Recipe

    Are you tired of desserts that feel too complicated or heavy for everyday cooking? This spring cakes recipe fits beautifully into real life because it uses simple ingredients, comes together quickly, and still feels like something you would proudly serve to guests. The texture is soft and light, making every bite feel fresh instead of dense or overly sweet.

    Do you want something that works for both busy weekdays and relaxed weekends? These cakes are flexible, budget-friendly, and easy to adjust for different occasions. You can prepare them ahead, store them easily, and even enjoy leftovers without losing flavor. Whether you are baking for family, friends, or just yourself, this is a recipe you will want to save again and again.

    Ingredients

    Are you unsure which type of flour or dairy gives the best soft texture? Use fresh, room-temperature ingredients for the best rise and smooth batter.

    • 2 cups all-purpose flour (reduce to 1 cup for 2 people, or increase to 3 cups for more than 4 servings)
    • 1 cup sugar (½ cup for 2 people, 1½ cups for larger groups)
    • ½ cup unsalted butter, softened
    • 2 large eggs (1 egg for 2 people, 3 eggs for larger batch)
    • 1 cup milk (½ cup for 2 people, 1½ cups for larger batch)
    • 2 tsp baking powder
    • 1 tsp vanilla extract
    • Pinch of salt

    Instructions

    Step 1: Preparation

    Are you wondering how to start without rushing the process? Preheat your oven to 180°C and prepare a baking pan by lightly greasing it. In a bowl, sift flour, baking powder, and salt together so the mixture feels light. For smaller or larger servings, keep the same ratio and adjust pan size to avoid uneven baking.

    Step 2: Main Cooking Process

    Are you worried about getting a smooth cake batter without lumps? In a separate bowl, cream butter and sugar until it becomes light and fluffy. Add eggs one by one, mixing gently. Pour in milk and vanilla slowly. If making a smaller batch, mix gently to avoid overworking the batter.

    Step 3: Combining Ingredients

    Are you unsure when to stop mixing the batter? Slowly add dry ingredients into the wet mixture and fold gently until everything just comes together. The batter should look smooth but not overmixed. For larger batches, fold in portions to keep the texture even and airy.

    Step 4: Finishing & Final Simmer

    Are you worried about baking time or dryness? Pour the batter into the pan and bake for 25–30 minutes until the top turns light golden and a toothpick comes out clean. Let it cool slightly before slicing. Adjust baking time slightly for smaller or larger portions.

    Why This Recipe Works for Busy Days

    Are you looking for a dessert that doesn’t demand hours in the kitchen? Spring cakes are perfect for busy days because the prep is quick, ingredients are simple, and baking is hands-free. You can make the batter ahead, refrigerate it, or bake in advance for later. It stores well, making it ideal for meal planning or last-minute guests.

    Tips & Tricks

    • Are you worried about a dry cake texture? Always measure flour correctly and avoid overmixing. Too much stirring can make the cake dense. For smaller batches, reduce mixing time slightly to keep it soft and airy.
    • Are you unsure when your cake is perfectly baked? Check with a toothpick in the center; it should come out clean but slightly moist. For larger batches, increase baking time slowly instead of raising heat.
    • Are you trying to get a fluffier texture? Use room-temperature eggs and butter so everything blends smoothly. Cold ingredients can affect rise. For half portions, keep ingredients at the same temperature for consistency.
    • Are you making this for different group sizes? Always keep ingredient ratios balanced instead of changing randomly. Scaling up or down works best when everything is adjusted together, not individually.

    Variations

    • Are you craving a richer version for special occasions? Add chocolate chips or cocoa powder for a meaty-style indulgent spring cakes twist. It still stays soft but feels more dessert-heavy for celebrations or family dinners.
    • Are you cooking for vegetarian preferences? This recipe is already vegetarian-friendly, but you can replace dairy milk with almond or oat milk while keeping texture light and fluffy for all servings.
    • Are you missing some ingredients at home? You can swap butter with mild vegetable oil for a softer crumb. This works well even when scaling for smaller or larger batches without affecting structure.
    • Are you looking for extra freshness? Add lemon zest or orange peel for a citrus herbal boost that makes the spring cakes feel lighter and more aromatic in every bite.

    Serving Suggestions

    • Are you planning a cozy tea-time table? Serve spring cakes with warm tea or coffee and fresh fruit on the side. For larger groups, slice into smaller squares so everyone can enjoy without feeling heavy.
    • Are you thinking of a family dessert plate? Pair it with whipped cream or yogurt for a soft and comforting combination. You can easily double portions for gatherings without changing the flavor balance.
    • Are you hosting guests at home? Present it with a dusting of powdered sugar for a simple but elegant look. Works well even when serving a smaller group of two or three people.
    • Are you looking for a picnic-friendly idea? Pack slices in small containers for easy sharing. This keeps well and stays soft even when prepared for larger batches ahead of time.

    Storage Instructions

    • Are you wondering how long spring cakes stay fresh in the fridge? Store them in an airtight container for up to 3–4 days. Smaller portions should be wrapped individually to avoid drying, especially when preparing ahead for busy weeks.
    • Are you unsure how to reheat without drying it out? Warm slices in the microwave for a few seconds or let them sit at room temperature. Larger batches may need slightly longer warming time but keep texture soft.
    • Are you thinking about freezing leftovers? Wrap pieces tightly and freeze for up to one month. Thaw slowly at room temperature so the structure stays light and fluffy for any serving size.
    • Are you planning ahead for events? You can bake the cake a day early and store it covered. For bigger gatherings, prepare multiple small trays instead of one large cake for easier storage and serving.

    Recipe Timing

    Are you planning your kitchen time and need a quick overview? This recipe takes about 15 minutes to prepare, 30 minutes to bake, and 10 minutes to cool, making the total time roughly 55 minutes for 4 servings.

    Nutrition Information (Approximate)

    Are you curious about what each slice contains? One serving of spring cakes has around 250–320 calories, 4–6g protein, and includes carbohydrates and fats depending on ingredients used. Values are approximate and may vary based on portion size or substitutions.

    FAQs

    Are you wondering if you can make spring cakes ahead of time? Yes, you can prepare it a day before and store it in an airtight container without losing softness.

    Are you worried about a dense cake texture? This usually happens if the batter is overmixed or baking powder is old.

    Are you looking for ingredient substitutes? Yes, milk can be replaced with plant-based alternatives without changing the structure much.

    Are you confused about why your cake is too dry? It may be overbaked or have too much flour added during mixing.

    Are you unsure how to store leftovers properly? Keep them sealed at room temperature for short use or refrigerate for longer freshness.

    Are you trying to adjust sweetness? You can slightly reduce sugar without affecting the texture of spring cakes too much.

    Conclusion

    Are you ready to bake something light, simple, and comforting that fits any season? Spring cakes are one of those recipes that quietly become a favorite because they are easy, flexible, and always satisfying. You can adjust them for small or large gatherings without stress, and they still taste fresh every time. This is the kind of bake that fits into real life, not just special occasions. Whether you make it for tea time, family, or just yourself, spring cakes always bring a soft, homemade touch to the table.

    Recipe Card

    Spring Cakes

    Recipe by admin
    Servings

    4

    servings
    Prep time

    15

    minutes
    Cooking time

    30

    minutes
    Calories

    250–320

    kcal

    Light and fluffy homemade spring cakes made with simple ingredients. Perfect for tea time, family desserts, or cozy weekends. Soft texture with a gentle sweetness that fits any occasion.

    Ingredients

    • 2 cups all-purpose flour (adjust: 1 cup for 2 people, 3 cups for larger groups)

    • 1 cup sugar (½ cup for 2 people, 1½ cups for larger groups)

    • ½ cup unsalted butter, softened

    • 2 large eggs (1 egg for 2 people, 3 eggs for larger batch)

    • 1 cup milk (½ cup for 2 people, 1½ cups for larger batch)

    • 2 tsp baking powder

    • 1 tsp vanilla extract

    • Pinch of salt

    Directions

    • Preheat oven to 180°C and grease a baking pan.
    • Mix flour, baking powder, and salt in a bowl.
    • Cream butter and sugar until light, then add eggs.
    • Add milk and vanilla, mixing gently.
    • Fold dry ingredients into wet mixture until smooth.
    • Pour into pan and bake for 25–30 minutes.
    • Cool slightly before serving.

  • Summer Salads

    Summer Salads

    Introduction

    Have you ever wanted something fresh on the table without spending hours in a hot kitchen? Summer salads are exactly that kind of easy comfort food people reach for when days feel long and warm. They’re light, colorful, and perfect for quick lunches, family dinners, or even lazy weekend meals. I often throw together a bowl like this when I don’t feel like cooking something heavy but still want real flavor on the plate. This recipe brings together crisp vegetables, soft textures, and a simple homemade dressing that feels refreshing every single time. Summer salads work beautifully for busy days when you still want something homemade and satisfying.

    Why You Will Love This Recipe

    Have you been searching for a meal that feels light but still keeps you full? This bowl of summer salads is made for exactly that balance. It’s fresh, budget-friendly, and flexible enough to use whatever you already have in your kitchen. You can prep it ahead, pack it for work, or serve it straight at the table without stress. The textures stay crisp, and the flavors blend in a way that feels naturally refreshing. Leftovers also hold up well, which makes it perfect for next-day meals. The best part is how easy it is to adjust for different portions, whether you’re cooking for two people or a larger family gathering. It’s the kind of recipe you’ll want to save and repeat often.

    Ingredients

    Have you ever wondered what makes a salad truly fresh and satisfying? Choosing crisp, in-season vegetables is the key to great summer salads.

    • 2 cups cucumber, chopped
    • 2 cups cherry tomatoes, halved
    • 1 cup sweet corn (boiled or canned, drained)
    • 1 cup red bell pepper, diced
    • 1/2 cup red onion, thinly sliced
    • 1/2 cup olives, sliced
    • 1/3 cup feta cheese, crumbled
    • 2 tbsp olive oil
    • 1 tbsp lemon juice
    • 1 tsp honey
    • Salt and black pepper to taste

    For 2 people, simply halve all ingredients. For more than 4, double everything while keeping the dressing slightly lighter so it doesn’t overpower the vegetables.

    Instructions

    Step 1: Preparation

    Have you ever noticed how prep makes cooking easier later? Wash all vegetables thoroughly, then chop cucumber, tomatoes, and peppers into bite-sized pieces. Slice onion thinly so it blends smoothly. If cooking for 2, reduce chopping amounts, or double for larger groups.

    Step 2: Main Cooking Process

    Have you ever wondered if salad needs cooking at all? Lightly boil or heat corn until soft and sweet, then let it cool. This step adds warmth contrast to the fresh vegetables. For smaller portions, use less corn; for larger, increase evenly.

    Step 3: Combining Ingredients

    Have you struggled with getting salads evenly mixed? In a large bowl, combine all vegetables, olives, and feta gently. Toss slowly so nothing breaks. If making for fewer people, use a smaller bowl; for more servings, mix in batches for even coating.

    Step 4: Finishing & Final Simmer

    Have you ever felt salad dressing doesn’t spread evenly? Whisk olive oil, lemon juice, honey, salt, and pepper, then drizzle over the salad. Toss lightly again. Let it sit for 10 minutes so flavors blend. Adjust quantity depending on serving size.

    Why This Recipe Works for Busy Days

    Have you ever needed something quick that still feels homemade? This recipe fits busy days perfectly because everything comes together in minutes. You can chop vegetables ahead of time and store them separately, then mix when needed. It also holds up well for next-day meals, making it ideal for lunchboxes. Whether you’re cooking for one or scaling up for a family, summer salads stay simple, fresh, and reliable without extra effort.

    Tips & Tricks

    • Have you ever had a salad turn watery too quickly? Always dry vegetables completely after washing to avoid excess moisture. This keeps the texture crisp. When cooking for 2, use smaller batches of fresh veggies; for larger groups, prepare in stages to maintain quality and freshness throughout.
    • Have you ever felt your salad lacked flavor balance? Don’t skip resting time after mixing. Letting it sit helps flavors settle evenly. For smaller servings, resting is shorter; for bigger portions, give a few extra minutes so everything blends properly without becoming soggy or dull.
    • Have you ever added too much dressing at once? Always drizzle slowly and toss gradually. This prevents soggy texture. For 2 servings, use less dressing; for larger bowls, mix in parts so every bite is evenly coated without overpowering the fresh vegetables.
    • Have you ever wanted more crunch in your salad? Add ingredients like cucumber or bell peppers just before serving. This keeps texture fresh. When scaling up for more people, increase crunchy vegetables slightly more than soft ones to maintain balance in every bite.

    Variations

    • Have you ever wanted a heartier version of summer salads? Add grilled chicken or shredded rotisserie chicken for a meaty twist. It turns the salad into a full meal while still keeping it light. Adjust portions easily—reduce meat for 2 servings or double for larger gatherings.
    • Have you ever wanted a completely plant-based bowl? Skip cheese and add chickpeas or boiled lentils instead. This keeps it filling and protein-rich. It works well for small meals or big batches, just scale legumes based on how many people you’re serving.
    • Have you ever run out of fresh ingredients but still wanted salad? Swap cucumbers with zucchini or use frozen corn instead of fresh. It keeps the same refreshing feel. Adjust quantities depending on availability, especially when cooking for fewer or more servings.
    • Have you ever wanted stronger flavor in your bowl? Add fresh herbs like basil or mint for a brighter taste. This small change lifts the whole dish. For larger portions, increase herbs slightly so the flavor stays noticeable across every serving.

    Serving Suggestions

    • Have you ever wondered what goes best with summer salads for dinner? Serve it alongside warm bread or toasted flatbread for a simple family meal. For smaller portions, keep bread minimal; for larger groups, add extra sides to make the table feel fuller and more inviting.
    • Have you ever wanted a light lunch idea? Pair the salad with boiled eggs or grilled tofu for added protein. It keeps the meal balanced without feeling heavy. Adjust add-ons based on serving size so each plate feels complete and satisfying.
    • Have you ever tried serving salad at gatherings? Place it in a large bowl with extra dressing on the side so guests can adjust flavor. This works beautifully for both small and large groups, making it flexible for any occasion.
    • Have you ever wanted a picnic-ready dish? Pack summer salads in jars or sealed containers for easy transport. It stays fresh and crisp. For bigger gatherings, prepare in batches to keep everything chilled and ready to serve.

    Storage Instructions

    • Have you ever wondered how long salad stays fresh in the fridge? Store summer salads in an airtight container for up to 2 days. Keep dressing separate if possible. For larger batches, divide into smaller containers to maintain freshness longer.
    • Have you ever reheated salad before? This recipe is best eaten cold, but if needed, lightly warm only the protein parts. Avoid heating vegetables as they lose crunch. Smaller portions are easier to manage for freshness.
    • Have you ever tried freezing salad? Fresh summer salads are not ideal for freezing due to water content. However, you can freeze cooked add-ins like corn or chicken separately. This helps when preparing larger future portions.
    • Have you ever wanted to prep ahead? Chop vegetables and store them separately for up to 2 days. Mix only before serving. This method works well for both small and large servings, keeping everything crisp and fresh.

    Recipe Timing

    Prep Time: 15 minutes
    Cook Time: 5 minutes
    Rest Time: 10 minutes
    Total Time: 30 minutes

    Nutrition Information (Approximate)

    Calories: 180–240 per serving
    Protein: 5–10g per serving
    Key nutrients: fiber, vitamin C, healthy fats from olive oil
    Values are approximate and may change depending on ingredients, brands, and portion sizes used in summer salads.

    FAQs

    • Can I make it ahead?
      Yes, you can chop everything a day before and mix just before serving for best freshness.
    • What is the most common mistake?
      Overdressing the salad, which makes vegetables soft and watery instead of crisp.
    • Can I replace feta cheese?
      Yes, you can use mozzarella, paneer, or skip cheese completely for a lighter version.
    • Why does my salad get soggy?
      Too much moisture from vegetables or dressing added too early usually causes this issue.
    • How long can I store it?
      Up to 2 days in the fridge, but best flavor is within 24 hours.
    • Can I change the flavor easily?
      Yes, add herbs, citrus, or a little extra seasoning to adjust taste as needed.

    Conclusion

    Have you ever wanted a recipe that fits into both busy weekdays and relaxed weekends without stress? This bowl of summer salads is exactly that kind of simple comfort food. It’s flexible, fresh, and easy to adjust for any serving size, whether you’re cooking for two people or a full table. You can change ingredients based on what’s in your kitchen and still get a delicious result every time. Summer salads bring a light, refreshing feeling to the table without effort. It’s the kind of recipe you’ll keep coming back to whenever you want something quick, colorful, and homemade.

    Recipe Card

    Summer Salads

    Recipe by admin
    Servings

    4

    servings
    Prep time

    15

    minutes
    Cooking time

    5

    minutes
    Calories

    180–240

    kcal

    A fresh, colorful, and easy summer salad made with crisp vegetables and a light homemade dressing. Perfect for quick lunches, family meals, or light dinners. Simple, refreshing, and ready in minutes.

    Ingredients

    • 2 cups cucumber, chopped

    • 2 cups cherry tomatoes, halved

    • 1 cup corn, cooked

    • 1 cup red bell pepper, diced

    • 1/2 cup red onion, sliced

    • 1/2 cup olives, sliced

    • 1/3 cup feta cheese

    • 2 tbsp olive oil

    • 1 tbsp lemon juice

    • 1 tsp honey

    • Salt and pepper to taste

    • (For 2 people: halve all ingredients. For more than 4: double quantities.)

    Directions

    • Wash and chop all vegetables into bite-sized pieces.
    • Cook corn briefly and let it cool completely.
    • Mix all vegetables, olives, and feta in a large bowl.
    • Whisk dressing ingredients and drizzle over salad.
    • Toss gently and let rest for 10 minutes before serving.

  • Baseball Snack Ideas: Easy Game Day Snack Board for Everyone

    Baseball Snack Ideas: Easy Game Day Snack Board for Everyone

    Introduction

    Are you looking for simple snacks that keep everyone happy during a baseball game night? This baseball snack ideas recipe is all about creating a fun, shareable mix that feels relaxed and stress-free. It brings together crunchy, salty, and slightly sweet bites that people can grab between plays without missing the action.

    Do you ever want something easy that doesn’t keep you stuck in the kitchen? I usually put this together when friends or family gather, especially on busy evenings when I want food ready fast but still homemade. It works perfectly for casual watching, kids’ hangouts, or even last-minute plans.

    Why You Will Love This Recipe

    Are you tired of making snacks that take too long but disappear in minutes? This mix of baseball snack ideas solves that problem by being quick, flexible, and budget-friendly. Everything comes together in one board or large tray, so there’s less mess and more time to enjoy the game.

    Do you want snacks that still taste good even after sitting out for a while? The combination of crunchy, savory, and light sweet bites keeps every handful interesting. It’s also easy to scale up or down depending on how many people show up. Leftovers store well, and you can remix them into lunchboxes or quick evening bites.

    Are you planning for different appetites in one group? This recipe adjusts easily for 2 people or even larger crowds without changing the flavor balance.

    Ingredients

    Are you unsure what makes a good game day snack mix actually work? Start with fresh, crunchy base ingredients so everything stays crisp and enjoyable.

    • 4 cups popcorn (lightly salted)
    • 2 cups pretzel twists
    • 1 cup roasted peanuts
    • 1 cup cheddar cheese cubes
    • 1 cup mini hot dogs (cooked and sliced)
    • 1 cup baby carrots
    • 1 cup cucumber sticks
    • ½ cup salsa or dipping sauce

    Do you need a smaller or larger portion? For 2 people, simply cut everything in half. For more than 4 people, double the ingredients while keeping the same mix balance.

    Instructions

    Step 1: Preparation

    Are you wondering how to start without feeling rushed? Prepare all ingredients first by washing vegetables, cutting cheese into small cubes, and cooking mini hot dogs until lightly browned. Arrange everything in separate bowls so assembly feels smooth and quick.

    Step 2: Main Cooking Process

    Are you unsure if any cooking is needed? Lightly warm the mini hot dogs until soft and juicy, then let them cool slightly. This keeps texture balanced. For smaller servings, reduce cooking time; for larger groups, cook in batches evenly.

    Step 3: Combining Ingredients

    Are you worried about mixing everything too early? Place popcorn, pretzels, peanuts, and vegetables into a large serving tray. Add cheese cubes and sliced hot dogs on top. Keep dips in small bowls so flavors stay fresh and separate until serving.

    Step 4: Finishing & Final Simmer

    Are you trying to make it look more appealing for guests? Add final touches by spacing colors evenly across the tray. Chill briefly if needed. For bigger servings, use multiple trays instead of overcrowding, so texture and crunch remain consistent.

    Why This Recipe Works for Busy Days

    Are you looking for snacks you can prepare without stress? This setup is perfect because everything can be prepped ahead and assembled in minutes. It’s ideal for busy evenings, school events, or game nights where timing matters. You can double it easily for crowds or reduce it for small family evenings without losing flavor or variety.

    Tips & Tricks

    • Are you worried about snacks turning soggy too fast? Keep wet ingredients like salsa separate until serving. This helps maintain crunch in popcorn and pretzels. For smaller portions, use airtight containers; for larger groups, serve in layered trays so freshness lasts longer during long game nights.
    • Are you unsure how to keep balance in flavors? Avoid over-salting early because pretzels and peanuts already add saltiness. Taste as you build. If cooking for 2 people, reduce seasoning slightly; for bigger groups, add extra mild ingredients to keep flavors balanced for everyone.
    • Are you trying to make it more kid-friendly? Skip spicy dips and stick to mild cheese and sweet crunch. Kids prefer simple textures. For larger servings, separate spicy and mild sections so everyone can choose without mixing flavors unintentionally.
    • Are you thinking about presentation stress? Use color contrast like green cucumber, orange carrots, and golden popcorn for visual appeal. For smaller servings, use a round plate; for larger gatherings, use a wide tray so everything stays visible and easy to grab.

    Variations

    • Are you wanting a meat-heavy version for stronger appetites? Add grilled chicken bites or beef strips instead of mini hot dogs. Keep seasoning mild so it blends well. For 2 people, use half the meat portion; for larger groups, increase protein while keeping snack balance light.
    • Are you looking for a vegetarian-friendly option? Replace hot dogs with roasted chickpeas or extra cheese cubes. This keeps texture satisfying without meat. For smaller portions, reduce cheese slightly; for bigger groups, add extra veggies for freshness and color variety.
    • Are you missing certain ingredients at home? Swap peanuts with almonds or cashews, and popcorn with tortilla chips. The mix still works well. Adjust portions depending on group size so crunch stays the main focus across all servings.
    • Are you wanting a flavor boost for guests? Add ranch seasoning or light chili powder over popcorn. It changes the taste without extra cooking. For 2 servings, sprinkle lightly; for larger groups, season in layers so flavor spreads evenly.

    Serving Suggestions

    • Are you planning a relaxed family movie or game night? Serve this mix in a large shared tray in the center of the table so everyone can reach easily. For smaller groups, a single bowl works well, while larger gatherings may need two or more trays for smooth serving.
    • Are you thinking about pairing it with something filling? Add sandwiches or sliders on the side to make it a full meal. For 2 people, one side dish is enough; for bigger groups, prepare multiple simple mains alongside the snack board.
    • Are you hosting kids or mixed-age guests? Keep dips separate and offer simple finger foods. This avoids mess and keeps things fun. Adjust portion size depending on how many kids are eating compared to adults.
    • Are you aiming for a party-style setup? Spread ingredients across multiple small bowls for a buffet feel. For small groups, keep everything on one board; for large groups, duplicate sections so guests don’t wait or crowd one area.

    Storage Instructions

    • Are you wondering how to keep leftovers fresh? Store dry ingredients like popcorn, pretzels, and peanuts in airtight containers at room temperature for up to 3 days. Keep vegetables and cheese in the fridge separately so textures stay fresh for smaller or larger leftover portions.
    • Are you planning to reheat anything later? Warm mini hot dogs gently in a pan or microwave for a few seconds until soft again. Avoid overheating to prevent dryness. For small portions, heat individually; for larger amounts, reheat in batches for even texture.
    • Are you thinking about freezing leftovers? Only freeze cooked meat portions, not vegetables or crunchy snacks. Store hot dogs in freezer-safe bags for up to one month. For 2 servings, freeze small packs; for larger batches, divide evenly before freezing.
    • Are you trying to prepare ahead for an event? Chop vegetables and cook proteins a day before, then assemble right before serving. This keeps everything fresh. For small groups, prep in small containers; for larger gatherings, organize ingredients in sections for quick assembly.

    Recipe Timing

    Prep Time: 15 minutes
    Cook Time: 10 minutes
    Rest Time: 5 minutes
    Total Time: 30 minutes

    Nutrition Information (Approximate)

    Are you curious about what’s inside this snack mix? Each serving has about 320–420 calories, depending on portion size. It provides 10–15g protein, along with fiber from vegetables and energy from grains and snacks. Values are estimates and can vary based on ingredients and portion adjustments.

    FAQs

    Can I make this ahead of time?
    Yes, you can prep ingredients a day before, but keep crunchy items separate until serving to maintain texture.

    What is the most common mistake?
    Mixing everything too early makes snacks soggy. Always assemble right before eating.

    Can I substitute peanuts?
    Yes, almonds, cashews, or sunflower seeds work well without changing the balance too much.

    Why does my mix feel soft?
    Moist ingredients were added too early. Keep dips and vegetables separate until serving.

    How do I store leftovers?
    Store dry and wet ingredients separately in airtight containers in the fridge or pantry.

    Can I adjust the flavor easily?
    Yes, add light seasoning like ranch powder or herbs after mixing for better control.

    Conclusion

    Are you ready to make game nights more fun without spending hours in the kitchen? This baseball snack ideas recipe is all about simplicity, flexibility, and sharing good food with people you care about. It adapts easily to small evenings or big gatherings, and you can change ingredients based on what you already have at home.

    Do you want something you can repeat again and again without boredom? This mix always feels fresh because you can customize it every time. Whether it’s a quiet night or a lively match day, it brings everyone together in the easiest way possible.

    Recipe Card

    Baseball Snack Ideas: Easy Game Day Snack Board for Everyone

    Recipe by admin
    Servings

    4

    servings
    Prep time

    15

    minutes
    Cooking time

    10

    minutes
    Calories

    320–420

    kcal

    A fun and easy snack board made for game nights. Crunchy, savory, and slightly sweet bites come together for the perfect sharing experience. Great for family gatherings, parties, or casual baseball watching.

    Ingredients

    • 4 cups popcorn

    • 2 cups pretzel twists

    • 1 cup roasted peanuts

    • 1 cup cheddar cheese cubes

    • 1 cup mini hot dogs (cooked, sliced)

    • 1 cup baby carrots

    • 1 cup cucumber sticks

    • ½ cup salsa or dip


    • For 2 people: use half of all ingredients.
      For more than 4 people: double quantities as needed.

    Directions

    • Prepare all ingredients by washing, cutting, and cooking hot dogs until lightly browned.
    • Warm hot dogs gently and let them cool slightly for better texture.
    • Arrange popcorn, pretzels, vegetables, cheese, and hot dogs on a large tray.
    • Add dips in small bowls and serve fresh for best crunch and flavor.

  • Healthy Spring Dinner Recipes

    Healthy Spring Dinner Recipes

    What can you cook when you want something light, fresh, and still filling after a long day? Spring dinners often feel tricky because you want comfort without heaviness, and that’s exactly where this dish fits in. This idea for healthy spring dinner recipes brings together simple seasonal vegetables, lean protein, and bright flavors that feel gentle on the stomach but still satisfying. When I make this at home, it usually turns into a one-pan meal that saves time and effort. It’s perfect for busy evenings, family dinners, or even a relaxed weekend plate when you want something clean and nourishing.

    Why You Will Love This Recipe

    What makes a spring dinner worth repeating every week without getting bored? This dish fits beautifully into healthy spring dinner recipes because it feels fresh but still deeply comforting. The flavors are light, lemony, and herby, while the vegetables stay tender and colorful instead of heavy or oily.

    You’ll love how simple it is to prepare, even on nights when you feel tired. It works well for meal prep, and leftovers taste just as good the next day. It’s budget-friendly, flexible, and easy to adjust depending on what you already have in your kitchen. Whether you’re cooking for family or just planning ahead for the week, this recipe brings a cozy balance of freshness and comfort that naturally fits into spring eating.

    Ingredients

    What type of chicken gives the best tender and juicy result for a spring skillet meal? For this recipe, boneless, skinless chicken thighs stay moist and flavorful, even with quick cooking.

    • 500g chicken thighs, boneless and skinless (use 250g for 2 people, or 750g–1kg for larger groups)
    • 250g baby potatoes, halved
    • 150g asparagus, trimmed
    • 100g green peas (fresh or frozen)
    • 3 tbsp olive oil
    • 3 cloves garlic, minced
    • 1 lemon (juice + zest)
    • 1 tsp dried thyme
    • Salt and black pepper to taste
    • Fresh parsley for garnish

    Instructions

    Step 1: Preparation (40 words)

    What should you do first to make cooking feel smooth and stress-free? Wash and cut all vegetables, halve the potatoes, and season the chicken lightly. If cooking for 2 people, simply reduce everything by half and prepare a smaller pan for even cooking.

    Step 2: Main Cooking Process (40 words)

    What’s the best way to build flavor without overcomplicating the dish? Heat olive oil in a large pan and lightly brown the chicken on both sides. For larger portions, cook in batches so the chicken sears instead of steaming in the pan.

    Step 3: Combining Ingredients (40 words)

    When should vegetables be added so they stay tender but not mushy? Add potatoes first, letting them soften slightly, then mix in garlic, asparagus, and peas. Stir gently so everything is coated in flavor. Smaller portions will cook faster, so reduce heat slightly.

    Step 4: Finishing & Final Simmer (40 words)

    How do you bring everything together for the perfect spring finish? Add lemon juice, zest, thyme, salt, and pepper, then simmer until everything is tender and coated. For larger servings, allow a few extra minutes so flavors blend evenly throughout the pan.

    Why This Recipe Works for Busy Days

    How can a single dinner save you time on packed evenings? This dish works so well because everything cooks in one pan, meaning less cleanup and more convenience. It’s one of those healthy spring dinner recipes that fits naturally into weekly meal prep, and leftovers can easily stretch into lunch for the next day without losing flavor or texture.

    Tips & Tricks

    • What can go wrong if you overcrowd the pan while cooking chicken? Avoid stacking chicken pieces too closely because they release steam instead of browning properly. If cooking for more than 4 people, always sear in batches so each piece develops color and flavor instead of turning soft and pale.
    • How do you keep vegetables from becoming too soft or watery? Add potatoes earlier but keep asparagus and peas for the final stage. For smaller portions, reduce cooking time slightly so vegetables stay bright and firm instead of overcooking in residual heat.
    • What makes the lemon flavor taste balanced instead of too sharp? Add lemon juice at the end, not the beginning, so it stays fresh and bright. If doubling the recipe, taste and adjust gradually so the acidity doesn’t overpower the natural sweetness of vegetables.
    • How can you keep the dish budget-friendly without losing quality? Use seasonal vegetables and adjust protein amounts based on servings. For two people, cutting everything in half still keeps flavor balanced, while larger families can stretch it easily by adding more potatoes or peas.

    Variations

    • What if you want a richer, meatier version for bigger appetites? Add sliced chicken breast or even turkey chunks instead of thighs. It still works well for healthy spring dinner recipes, but you may need a little extra olive oil to keep the lean meat juicy, especially when cooking larger portions.
    • How can you make this fully vegetarian without losing protein? Replace chicken with chickpeas or white beans. They absorb the lemon and garlic beautifully. For two servings, use one can; for larger groups, double it and add extra greens for balance and texture.
    • What can you swap if asparagus is not available in your kitchen? Green beans or zucchini work just as well and keep the spring feel alive. Slice them evenly so they cook at the same speed, especially when scaling the recipe up for more than four servings.
    • How can you change the flavor profile without changing the base recipe? Add fresh basil, dill, or rosemary for a different herb direction. A small pinch of chili flakes also adds warmth without overpowering the light spring taste, especially useful when cooking larger family portions.

    Serving Suggestions

    • What sides make this meal feel more complete for family dinners? Serve with warm whole-grain bread or a light rice pilaf. It helps soak up the lemony juices and makes the meal more filling. For larger groups, simply double the side dishes while keeping the main skillet portion balanced.
    • How can you turn this into a cozy plated dinner for guests? Plate the chicken over vegetables with a drizzle of pan juices and fresh parsley. A small salad on the side adds freshness. Adjust portion sizes slightly smaller per plate if serving multiple guests.
    • What works well for a light lunch pairing? Pair with a simple cucumber yogurt salad or mixed greens. This keeps the meal refreshing and easy on the stomach. For two people, reduce portions and save leftovers for next-day lunch bowls.
    • How can you make it more filling for hungry evenings? Add roasted sweet potatoes or quinoa on the side. These absorb flavor well and stretch the dish comfortably when serving more than four people.

    Storage Instructions

    • How long can you safely keep leftovers without losing freshness? Store in an airtight container in the fridge for up to 3 days. For smaller portions, divide into single servings so reheating is quicker and more even, especially for lunch meal prep.
    • What is the best way to reheat without drying the chicken? Warm gently in a pan with a splash of water or broth. Avoid high heat, as it can make chicken tough. For larger portions, reheat in batches to maintain texture and moisture.
    • Can this dish be frozen for later use? Yes, freeze in portioned containers for up to 2 months. Thaw overnight in the fridge before reheating. Smaller portions freeze faster and reheat more evenly than large bulk containers.
    • How can you prepare this meal ahead of time for busy weekdays? Chop vegetables and marinate chicken a day before. Store separately in the fridge so everything is ready to cook quickly. This works especially well if you’re planning multiple servings for a family week.

    Recipe Timing

    Prep Time: 15 minutes
    Cook Time: 30 minutes
    Rest Time: 5 minutes
    Total Time: 50 minutes

    Nutrition Information (Approximate)

    Each serving contains roughly 380–420 calories depending on portion size and oil used. Protein ranges between 28–32g per serving. It also provides fiber, vitamin C, and potassium from fresh vegetables. These values are estimates and may change based on ingredient choices and serving adjustments.

    FAQs

    What can I prepare ahead of time for this recipe?
    You can chop vegetables and marinate chicken a day before. Keep everything refrigerated separately for best texture.

    What is the most common mistake when making this dish?
    Overcrowding the pan is the main issue. It stops proper browning and makes vegetables too soft.

    Can I replace chicken with another protein?
    Yes, turkey, chickpeas, or tofu work well and still keep the spring flavors balanced.

    Why does my sauce feel too watery?
    It usually happens when vegetables release too much moisture. Cook uncovered for the last few minutes.

    How should I store leftovers safely?
    Keep them in an airtight container in the fridge and use within 3 days for best freshness.

    Can I adjust the flavor if it feels too mild?
    Yes, add extra lemon zest, garlic, or fresh herbs just before serving to brighten the taste.

    Conclusion

    What makes a dinner something you’ll actually want to cook again next week? This dish brings together freshness, comfort, and simplicity in a way that feels natural for everyday cooking. It fits perfectly into healthy spring dinner recipes because it doesn’t demand effort but still delivers real flavor and satisfaction. You can easily adjust ingredients, portions, and herbs depending on your mood or family size. Whether you cook it for two or a full table, it stays flexible and dependable. It’s the kind of meal you come back to when you want something light, warm, and quietly satisfying.

    Healthy Spring Dinner Recipes

    Recipe by admin
    Servings

    4

    servings
    Prep time

    15

    minutes
    Cooking time

    30

    minutes
    Calories

    380–420

    kcal

    healthy spring dinner recipes
    Short Description:
    A light and fresh one-pan chicken and vegetable dinner made with seasonal spring ingredients, lemon, and herbs. Simple, cozy, and perfect for weeknights.

    Ingredients

    • 500g chicken thighs, boneless and skinless

    • 250g baby potatoes, halved

    • 150g asparagus, trimmed

    • 100g green peas

    • 3 tbsp olive oil

    • 3 cloves garlic, minced

    • 1 lemon (juice + zest)

    • 1 tsp dried thyme

    • Salt and black pepper

    • Fresh parsley

    Directions

    • Wash and prepare all vegetables. Season chicken lightly with salt and pepper.
    • Heat olive oil in a pan and brown chicken on both sides until golden.
    • Add potatoes first, then garlic, asparagus, and peas. Stir gently.
    • Add lemon juice, zest, thyme, salt, and pepper. Simmer until cooked through.
    • Rest for a few minutes, garnish with parsley, and serve warm.

  • Spring Cake Recipe

    Spring Cake Recipe

    Introduction

    Have you been looking for a light dessert that feels fresh but still comforting at the same time? A spring cake is exactly that kind of treat that fits perfectly into warm afternoons, family gatherings, or when you just want something sweet without feeling heavy. This cake brings soft texture, gentle sweetness, and a hint of freshness that reminds you of blooming seasons. I usually bake it when I want something simple but still special enough to share. The beauty of this spring cake is how easy it is to prepare with basic ingredients already in your kitchen.

    Why You Will Love This Recipe

    Are you tired of desserts that feel too complicated or require fancy steps? This spring cake is one of those recipes that feels calm and stress-free from the first mix to the last bite. It has a soft, airy texture with a light sweetness that doesn’t overwhelm your taste buds. It’s also flexible enough to fit different occasions, whether you’re serving guests or just making something cozy for your family evening.

    Are you worried about leftovers going to waste? The best part is that this spring cake stays soft for a couple of days and even tastes better the next day as flavors settle. It’s budget-friendly, uses simple pantry ingredients, and works beautifully for both small and slightly bigger gatherings. Once you bake it, it easily becomes a recipe you’ll want to save for every season.

    Ingredients

    Are you unsure which ingredients make a cake feel truly light and fresh? The secret for this spring cake is using fresh eggs and good-quality butter for a soft and airy texture.

    • 2 cups all-purpose flour
    • 1 cup sugar
    • 3 large eggs
    • 1/2 cup melted butter
    • 1 cup milk
    • 1 tsp vanilla extract
    • 1 tbsp lemon zest
    • 2 tsp baking powder
    • Pinch of salt
    • 1/2 cup fresh berries (optional topping)

    For 2 people, simply reduce all ingredients by half. For more than 4 servings, double everything evenly while keeping baking time slightly longer if using a larger pan.

    Instructions

    Step 1: Preparation (40 words)

    Are you wondering how to start without making a mess in the kitchen? Preheat your oven and grease a baking pan lightly. Whisk eggs and sugar until fluffy and pale. This helps create a soft base for your spring cake texture.

    Step 2: Main Cooking Process (40 words)

    Are you worried about mixing everything in the right order? Slowly add melted butter, milk, and vanilla into the egg mixture. Stir gently so the air stays inside. This keeps your spring cake light instead of dense or heavy after baking.

    Step 3: Combining Ingredients (40 words)

    Are you unsure when flour should go in? Sift flour, baking powder, and salt together, then fold them into the wet mixture. Add lemon zest and mix lightly. Avoid overmixing so the batter stays smooth and your spring cake remains soft.

    Step 4: Finishing & Final Simmer (40 words)

    Are you wondering when it’s perfectly baked? Pour batter into the pan and bake until golden and a toothpick comes clean. Let it cool slightly before adding berries. For larger batches, increase baking time a little while checking doneness carefully.

    Why This Recipe Works for Busy Days

    Are your weekdays too busy for long dessert preparation? This spring cake fits perfectly into quick baking routines because it uses simple steps and everyday ingredients. You can prepare the batter ahead of time and bake it fresh when needed. It also stores well, making it ideal for quick sweet cravings or unexpected guests.

    Tips & Tricks

    • Are you struggling with a dry cake texture? Always avoid overbaking and check your oven early. Every oven is different, so even a few extra minutes can change softness. For smaller portions, reduce baking time slightly, and for larger cakes, check the center carefully before removing.
    • Are your cakes turning out too dense? Make sure eggs and sugar are whisked until light and airy before adding other ingredients. This step traps air, which helps your spring cake rise properly. If scaling down or up, keep mixing time consistent for best texture.
    • Are you unsure about flavor balance? Fresh lemon zest makes a big difference, but don’t overdo it. Too much can overpower the softness. For bigger batches, adjust gradually instead of doubling zest directly, keeping the taste gentle and refreshing.
    • Are you worried about sticking or breaking? Always grease your pan well and let the cake cool before removing. Smaller portions cool faster, while larger ones need extra resting time to hold shape properly without breaking.

    Variations

    Are you looking to change the flavor without losing the soft texture? A meat-based twist isn’t common for a spring cake, but if you prefer a savory-sweet fusion, you can lightly add caramelized bacon bits on top for a unique contrast. Keep portions small when experimenting.

    Are you following a vegetarian lifestyle and want more natural flavors? The classic spring cake is already vegetarian-friendly, but you can enhance it with extra fruits like strawberries or blueberries. For larger servings, simply increase fruit topping without changing base ingredients.

    Are you missing certain ingredients at home? You can swap butter with mild olive oil for a lighter texture. This keeps the cake moist while slightly changing flavor. When adjusting quantities for fewer servings, reduce oil proportionately to avoid heaviness.

    Are you looking for stronger aroma and taste? Add a pinch of cinnamon or cardamom for a warm twist. This works beautifully for both small and large batches, but keep spices light so they don’t overpower the delicate spring cake flavor.

    Serving Suggestions

    Are you wondering how to make this cake feel extra special on the table?

    • Fresh Cream Side: Serve slices with lightly whipped cream and fresh berries for a soft, elegant touch perfect for family gatherings or small groups. Adjust cream quantity based on number of guests easily.
    • Tea Time Pairing: Enjoy with warm tea or coffee for a cozy afternoon break. It works beautifully for both single servings or larger platters when guests arrive unexpectedly.
    • Fruit Platter Combo: Add fresh seasonal fruits on the side for a refreshing balance. This makes the spring cake feel lighter and more colorful on the table.
    • Celebration Style: Dust with powdered sugar and arrange on a large tray for parties. Increase portions easily for bigger gatherings without changing presentation style.

    Storage Instructions

    Are you worried about your cake going dry overnight?

    • Fridge Storage: Keep the spring cake in an airtight container for up to 3–4 days. Smaller portions cool and store faster, while larger cakes should be sliced before refrigeration for better freshness.
    • Reheating: Warm individual slices in the microwave for a few seconds to restore softness. Avoid overheating, especially for small portions, as it may dry the texture.
    • Freezing: Wrap slices tightly and freeze for up to 1 month. Thaw at room temperature. This works well for both single servings and larger batches.
    • Make-Ahead Tips: You can prepare the batter a few hours early and bake later. For bigger quantities, mix in batches to maintain smooth consistency.

    Recipe Timing

    Are you planning how long this spring cake will take from start to finish?
    Prep Time: 15 minutes
    Cook Time: 30–35 minutes
    Rest Time: 15 minutes
    Total Time: Around 1 hour

    Nutrition Information (Approximate)

    Are you curious about what’s inside each slice of this spring cake?
    Each serving contains approximately 250–320 calories depending on portion size. It provides moderate carbohydrates, a small amount of protein, and fats mainly from butter and eggs. It also includes trace nutrients from fruits if added. These values are estimates and may change based on ingredient brands, portion sizes, and adjustments for smaller or larger servings.

    FAQs

    Can I prepare spring cake ahead of time?
    Yes, you can bake it a day before and store it in an airtight container. It stays soft and fresh, especially if refrigerated properly.

    What is the most common mistake in this recipe?
    Overmixing the batter is the biggest issue. It removes air and makes the cake dense instead of light and fluffy.

    Can I replace any main ingredient?
    Yes, butter can be replaced with mild oil, and milk can be swapped with plant-based alternatives without changing the texture too much.

    Why is my cake too dry or too wet?
    Dry cake usually means overbaking, while wet texture means underbaking. Always check with a toothpick in the center.

    How should I store leftovers safely?
    Keep slices in an airtight box in the fridge. It stays good for several days and retains softness when covered properly.

    Can I adjust the sweetness level?
    Yes, you can reduce sugar slightly without affecting structure. For larger batches, adjust gradually instead of cutting too much.

    Conclusion

    Are you searching for a dessert that feels simple, fresh, and comforting at the same time? This spring cake is one of those recipes you can return to again and again without stress. It fits family dinners, tea time, or even small celebrations where you want something homemade and warm. The soft texture and light flavor make it easy to enjoy in every season. Once you try this spring cake, you’ll find yourself adjusting it with your own small twists and making it part of your regular baking routine.

    Spring Cake Recipe

    Recipe by adminCourse: Recipe
    Servings

    4

    servings
    Prep time

    15

    minutes
    Cooking time

    30

    minutes
    Calories

    250–320

    kcal

    A soft, light, and fresh homemade spring cake made with simple pantry ingredients. Perfect for family gatherings, tea time, or a cozy dessert at home.

    Ingredients

    • 2 cups all-purpose flour (halve for 2 people, double for more than 4)

    • 3 large eggs

      1 cup sugar

      1/2 cup melted butter

      1 cup milk

      1 tsp vanilla extract

      1 tbsp lemon zest

      2 tsp baking powder

      Pinch of salt

      1/2 cup fresh berries (optional topping)

    Directions

    • Preheat oven and grease baking pan. Whisk eggs and sugar until fluffy.
    • Add melted butter, milk, and vanilla. Mix gently.
    • Fold in sifted dry ingredients and lemon zest carefully.
    • Pour into pan and bake until golden. Cool before serving.